
Applying all this to Chart Only Patterns / Foreign Language patterns
written by TuesdayFortnite
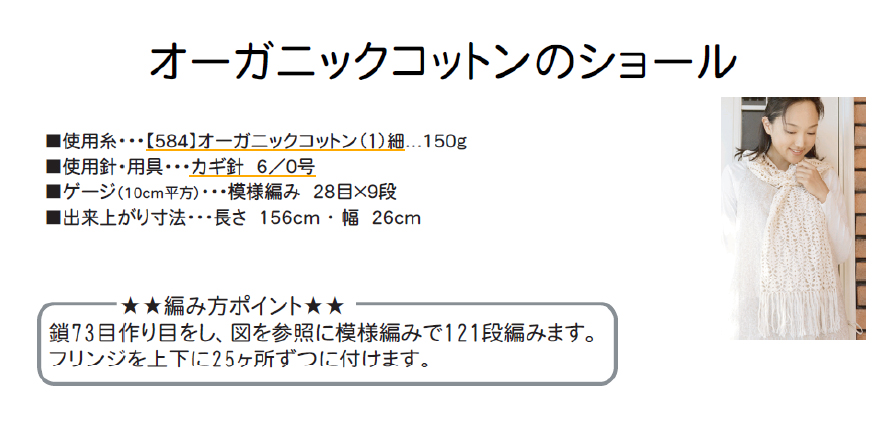
We’re going to take a look at the Organic Cotton Shawl from Pierrot. This chart was specifically mentioned in one of the forums on Ravelry, and it’s available free. It’s now available in English, but originally it was only in Japanese – so I’m using the Japanese chart to show you how to read them..
I’m going to break the page down into little bits and walk you through the process I use to ‘translate’ a pattern. This means it’s jumps around a bit – but don’t panic, it will all make sense in the end.
Ok, First up we have the name, a pretty photograph and then underneath we have a lot of what looks like gibberish to our Roman Alphabet eyes. We’ll come back to this in a second..
Now, deep breath, and Let’s look at the chart…
 Very quickly I can see some things I can work out…
To start with we know from previous that the
-
 is always ‘yarn over and through’ (a US Double, or a UK treble) and that
 -
 is a single chain stitch.
So we don’t need a legend to tell us what stitches we need to do…
(incidentally, if English isn’t your first language, or you are not sure if we are all talking about the same stitch, there’s a handy ‘translation’ guide at Crochet Memories for what the different stitches are called in a variety of languages)
I can also work out the following bits without over taxing the little grey cells too much..


 All well and good. I know that repeats go in the dotted line bits, I know my row numbers and I know that some of the numbers are measurements.
But there are a couple of symbols and notes I am particularly interested in.
 First up down the bottom right of the chart is a little section starting with the number 12 and surrounded by little lines. That’s my pattern repeat! So I have a 12 stitch pattern repeat. Next to the 12 is a little symbol that looks a bit like a book case. That symbol also appears at the bottom of the ‘finished shawl’ graphic, under the 26c. That tells me there is 73 stitches in my original chain (it stands to reason that little bookcase symbol means ‘stitch’ in this context. And of course, once I know that, the symbol is likely be the same on all Japanese charts so it’s something I can look for in future.
73 divided by 12? 6 (plus that magic 1) – so that’s 6 repeats.
What’s that I see below the 73?
The number 6 and a strange sort of ‘t’ shape.
That strange ‘t’ must mean ‘repeat’ (because of the maths above, right – I’m looking for something that says ‘6’)
Oh, in that case the body of my shawl is 15 repeats. How do I know? It’s right there on the side of my schematic – under the 134c and the (121 gobbledegook).
So I know my stitch repeat is 12, and that I need 6 of them (with a starting chain of 73). I also know I need 15 body repeats – but what’s the body repeat?
 Handily that’s been marked out for us as well – that little bracket going from 1 to 10? That’s our repeat. Ok, how did I work that out?
Well, if you look just above the point where it tells you the stitch repeat, you can see a single DC. Into that goes a shell, then another one (with 2DC either side), then another one (with 3DC), then another one (with 4DC!), then 3DC, then 2DC, the 1DC Shells coming back to 1 single DC on it’s own.
We’re back to the start (!) and that happens on row 9. Row 10 is the same as Row 2 (so really we have an 8 row repeat, but I can work that out).
Now, remember I said at the start we’d come back to the scary looking text at the top of the pattern? Well here we go..
 We’re interested in the numbers, and I’m going to take each bullet point in turn.
![]() In that first line we have two numbers [584] and …150g. So I need 150g of something. I bet that [584] (educated guesswork here) is the yards or meters. Because the schematic measurements are in cm and not inches, it’s reasonable to think that this is probably also metric and referring to meters. Using something that tells me how many meters are in 100g (like my handy tool) I know that’s about 400 per 100g (the maths looked like this if you’re interested: 584/3 = 195 per 50g. 195×2 = 390 per 100g) 390meters per 100g is 5ply or sport weight yarn – so I’m probably looking for something about that weight (note: 4ply comes in at 400 per 100g, so you could substitute that pretty easily)
In that first line we have two numbers [584] and …150g. So I need 150g of something. I bet that [584] (educated guesswork here) is the yards or meters. Because the schematic measurements are in cm and not inches, it’s reasonable to think that this is probably also metric and referring to meters. Using something that tells me how many meters are in 100g (like my handy tool) I know that’s about 400 per 100g (the maths looked like this if you’re interested: 584/3 = 195 per 50g. 195×2 = 390 per 100g) 390meters per 100g is 5ply or sport weight yarn – so I’m probably looking for something about that weight (note: 4ply comes in at 400 per 100g, so you could substitute that pretty easily)
Dandy. Lets look at line 2…
![]() That looks suspiciously like a hook size to me – and a quick google of Japanese hook sizes gives me this chart (shout out to Cotton and Cloud for an awesome resource) which tells me that’s equivalent to a 3.5mm hook (Canadian 9, US E/4). Ok, I now know how much yarn I need, and what size hook. As a double check, a 3.5mm hook for 4ply feels within the right ballpark (obviously if you do this and end up with lace-weight and a 10mm hook, or chunky and a 1.25mm hook, you need to look again at the numbers)
That looks suspiciously like a hook size to me – and a quick google of Japanese hook sizes gives me this chart (shout out to Cotton and Cloud for an awesome resource) which tells me that’s equivalent to a 3.5mm hook (Canadian 9, US E/4). Ok, I now know how much yarn I need, and what size hook. As a double check, a 3.5mm hook for 4ply feels within the right ballpark (obviously if you do this and end up with lace-weight and a 10mm hook, or chunky and a 1.25mm hook, you need to look again at the numbers)
Ok, line 3 is quite involved, and I have a sneaky suspicion this tells me my gauge.
![]() 10cm x 10cm (or 4″ by 4″) is a common size for taking a gauge measurement, so that is probably talking about gauge. Having worked out the bookcase symbol means ‘stitches’ previously, I now know that I needs something that is 10cm square and is 28 stitches wide and a (currently unknown) number of rows high – so that must mean that 9 must be rows.
10cm x 10cm (or 4″ by 4″) is a common size for taking a gauge measurement, so that is probably talking about gauge. Having worked out the bookcase symbol means ‘stitches’ previously, I now know that I needs something that is 10cm square and is 28 stitches wide and a (currently unknown) number of rows high – so that must mean that 9 must be rows.
That symbol turns up again at the side of my schematic. Next to the number 121.
 I already know I have 15 repeats of an 8 row pattern, and funnily enough 15 x 8 = 120 – so there must be an extra row on the end to make the pattern work!
So what have we got? We have now worked out that:
- we need to chain 73 to start
- we have 6 pattern repeats cross the width,
- we need to do 121 rows (or 15 repeats) of the body repeat
- to give us a shawl that is 26cm by 134cm
- and then we can add an 11cm fringe if I wish).
- we will be using about 600meters of a heavy 4ply or 5ply yarn
- with a size 3.5mm hook
- we are using nothing but chain and DC stitches
Now all I have left to do is follow the chart….
And in case any of you want a double check of your working out – here’s the foundation and first two rows:
- Foundation row: Chain 73 and 3 turning chain
- Row 1…. 4DC into the 4th Chain from the hook, Ch2, *1DC into 6th Chain, Ch2, [4DC, Ch2, 4DC] into 6th Chain, Ch2**
Repeat from * to ** across row till last 6 chain. In last chain 5DC. - Row 2… 3ch (to act as first DC) and 3DC into top of last DC of previous row, 2ch, *[DC, 2Ch, DC] into top of single DC, 2Ch, [3DC, 2Ch, 3DC] into 2Ch space of the 4DC cluster on previous row, 2Ch** repeat until you get to the edge where you 4DC into the 3rd of the 3 turning chain.
I reckon you can work out the rest yourselves! See that wasn’t that scary was it? And you’ve just read your first ‘non English’ or (effectively) Chart only pattern. Go you! Go reward yourself with a nice cup of tea.
Part 4, Reading Circular and triangular patterns – coming soon!
I have been trying to get the courage up to try a pattern by chart only. I have no doubt your 101’s will help me greatly. I look forward to your future instructions.
Thank you so much for making these instructions available. They are so clear and complete! Really excellent job.
Thank you. Glad you have enjoyed them!
Thank you for the Chart Reading guidelines. It makes me look forward to trying out some of the stitches.
Thank you for posting your very helpful tutorials. I get part 3 when I click on the link for part 3b. Is the wrong pdf file attached?
Apologies Betsey – the PDF is one big document for the whole of Part 3 – so part 3b is at the end under the heading ‘applying this to another pattern’
I have been trying to find time to split these into two documents and do a little update rewrite but just haven’t had chance yet!